Support Overview

Tutorials

Usage Examples

Upgrade Information

FAQ

New Release History

You are here:   Visualware >   MyConnection Server >   Support >   Online Manual Overview >   Access Series Quickstart Guide

Access Series Quickstart Guide

This Quick Start guide is designed for getting an MCS Access Series up and running with MyConnection Server version 9.


Connecting and Configuring

Connect the MCS Access Series power supply and connect MCS Access Series appliance to the LAN using an RJ45 cable. The LAN must support DHCP services.

Using a PC workstation connected to the same LAN as the Access Series device. The configuration utility can be found in the Access Series Embedded MCS kit which can be downloaded from here. Once installed simply run the eMCS configuration program "AccessCfg.exe" in the Access Series Upgrade folder.

The following eMCS configuration utility dialog will appear.

1.3. Select the MCS Access Series appliance to be configured.

If the MCS Access Series IP address is known, type the IP address into the "board IP address" field as shown Fig 1, item 1. Alternatively if the IP address is not known, click search button to locate the MCS Access Series IP automatically.

Once the MCS Access Series device has been located click the connect button as shown Fig 1, item 2. The status field will show 'connected'.

Click the network configuration tab , as shown Fig 1 item 3.

Notes: If there is more than one MCS Access Series device on the local network, clicking the search button will locate all devices, use the drop list box to select the MCS Access Series device required.

If you wish to connect to an MCS Access Series device that is not the local subnet, type the IP address of the MCS Access Series and click connect . Note requires UDP port 20010 to be open and available.


 Network configuration options dialog

1.4: DHCP (1 in the image above).

If not using DHCP to use the default settings, uncheck 'use DHCP'  and enter the IP address required for the local subnet. Not recommended, it is advisable to use DHCP.

Board address: The IP address required for the local network. Default is 192.168.0.98.

Subnet Mask: The subnet mask as required for the local network. Default is 255.255.255.0.

Default Gateway: The local network gateway IP address to access the Internet/WAN.


1.5 Unique Name (2 in the image above).

Set the Unique name that is required to identify the MCS Access Series device when there are several MCS Access Series appliances active on the network.

The Agent and Unique names are used on the MyConnection Server to manage the work order for the MCS Access Series device.

NOTE: If the agent name field is not blank then the MCS Access Series appliance will NOT be registered for management by MyConnection Server.


1.6. Server IP address (3 in the image above).

Set the server IP address and port number to be the IP address and port number of the MyConnection Server that will be used to manage the MCS Access Series license and work order assignment.

NOTE: A password can be added prevent access to the MCS Access Series from unauthorized users.


1.7: Complete (4 in the image above).

The MCS Access Series connection and configuration is now complete. The next step is to define and allocate an MCS Access Series work order.

Creating a remote agent work order and assigning it to an MCS Access Series

2.1: The process of defining a Remote Agent (RA) is the normal way that MyConnection Server defines and manages a work order for a remote connection test .

When using an MCS Access Series device there is no requirement to create and download a remote software agent, however to maintain a seamless interface between remote agents and MCS Access Series appliances a place holder remote agent must be created in order to define a work order that can be assigned to an MCS Access Series.

To start the definition process click the 'Create RA' link located on the Main Menu page of the MyConnection Server, as shown in the image below.


Fig 2.1

Step 2.2: Choose the test for the Remote Agent to perform. These can either be the standard predefined tests shown in section one or a custom defined test that can perform more than one test type, for example a speed test combined with a VoIP test. For information on setting up a custom test click here.


Fig 2.2

Step 2.3: Select the work order run type required. The remote agent can either be set to perform a test work order continuously until manually cancelled or the agent can be set to perform a work order a limited number of times which will stop automatically when the limit has been reached.


Fig 2.3

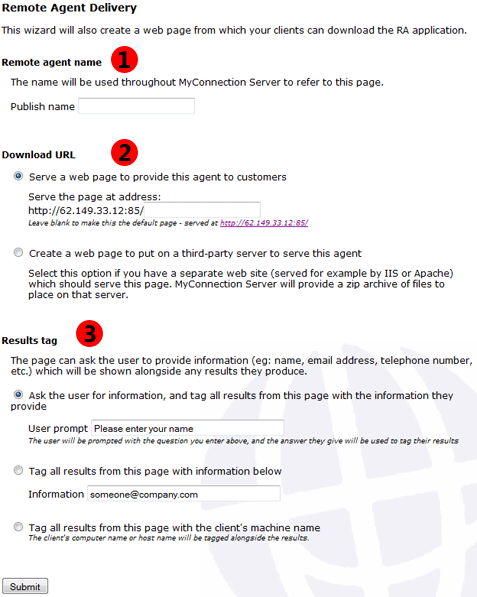
Step 2.4: Remote agent delivery options

The first section defines the Publish Name. This is used to set a name to identify and differentiate the remote agent after it has been created. It is advisable to use a name that is meaningful for the work order description. A name like 'Test1' can be confusing several days later whereas a name like 'SpeedVoIPG711' is more informative.

The second section defines remote agent download URL. By default the download URL title provided by MyConnection Server will match the Publish Name defined above. Select 'third party web site' to create a basic default download HTML page that can be placed on a third party web server.

The third section defines a tag string to be included as a session identifier with the results. This tag string allows result data to be retrieved using the identifier for easy selection over extended time periods. Select the option required.


Fig 2.4

Step 2.5: Complete. The remote agent and associated work order definition has been created. The next step (section 3 defines the process of assigning the remote agent work order to the Access-CT.

Permitting the MCS Access Series device to accept work orders

NOTE: The MCS Access Series box will only appear in MyConnection Server MCS Access Series panel if the MCS Access Series has been configured with a blank agent name and the server details are correctly defined. Please review the setup instructions in section 1 above.

3.1: MCS Access Series inventory list

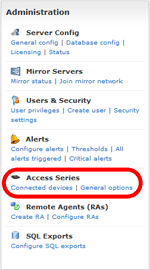
Click the MCS Access Series connected devices link in the administrators section as shown below.

3.2: Grant permission

The MCS Access Series appliance configured in section 1 should appear in the MCS Access Series list section. If the MCS Access Series of interest is not showing in the inventory list please review section 1 above.

Any new MCS Access Series will show in the inventory list with a status of 'awaiting permission'. Permitting an MCS Access Series is the process that assigns the work order (created in step 2 above) to the MCS Access Series and allows the MCS Access Series to start the testing process. To do this click the permit link to the right of the MCS Access Series as shown in the image below.

3.3: To complete the process choose the remote agent and click permit.

The drop down list, shown below, called "Assign RA tasks" will now contain the newly created remote agent from the previous section. Select this remote agent and click permit.

Viewing the results for an MCS Access Series

The quickest way to view results for an MCS Access Series is to use the results link for the remote agent that the MCS Access Series is using.

4.1: Click the "configure RA's" link in the administration section of the MyConnection Server main menu, as shown below.

Step 4.2: Locate the Remote Agent that is connected to the MCS Access Series you want results for and click the results link. As shown below.

Step 4.3: A web report will open with all results from this remote agent. As shown below:

Step 4.4: In some cases the remote agent will also be used by other users and not just show results for the MCS Access Series. To filter this out simply select MCS Access Series from the test list. The easiest way to do this is to unselect all and then just check the MCS Access Series option, as shown below.

Quality (Access Series) test results


MyConnection Server

Home
Online Testing Portal
Download
Purchase
Resources
Support

Visualware Products

VisualRoute
eMailTrackerPro
Visual IP Trace


© Visualware Inc. 2014 - All Rights Reserved