Support Overview

Tutorials

Usage Examples

Upgrade Information

FAQ

New Release History

You are here:   Visualware >   MyConnection Server >   Support >   Tutorials >   Creating a work order for an Access Series device

Creating a work order for an Access Series device

Step 1

The process of defining a Remote Agent (RA) is the normal way that MyConnection Server manages a remote connection test work order.

When using an Access Series device there is obviously no need to create and download a remote software agent, however a place holder remote agent must be created.

This Remote Agent definition is used for storing and managing the Access Series work order. The MyConnection Server cannot distinguish between a software agent and the Access Series appliance.

To start the definition process click the 'Create RA' link located on the Main Menu page of the MyConnection Server.


Step 2

Choose which tests you want the Remote Agent to perform. These can either be the standard predefined tests shown in section one or a custom test that can perform more than one test.

Step 3

The remote agent can be set to perform continuous tests as long as the application is running. It can also be set to run a number of times and then stop. Both options are shown in the image below along with the relevant options. Only one option can be chosen.

Step 4

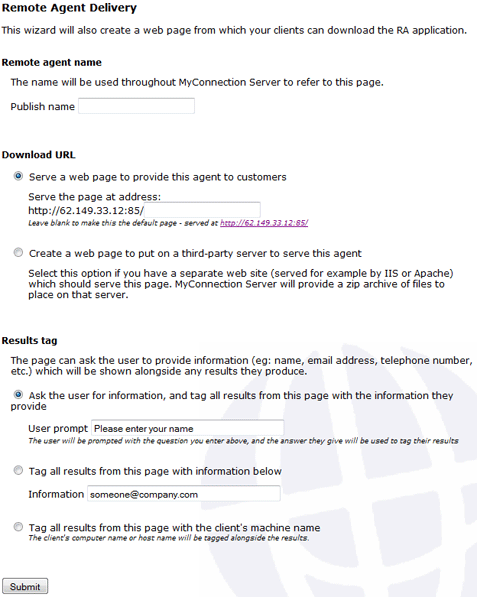
This section is to do with publishing the agent.

The first section is the Publist Name. This is used to set a name that will help you easily identify this remote agent. This name will be used to reference it throughout MyConnection Server. The second section is the Page URL. If you want to server the Remote Agent from your MyConnection Server then choose the first radio button and set a page name to serve it from.

The second section is to have a third party web site server the page. If this option is chosen then MyConnection server will provide a download zip file with the files that need to be published to the third party web site.

The third section is the results tag. You can either have the user enter their name or another piece of information to help identify who is doing the test, or, you can choose a tag that will show next to all results from this agent no matter who runs a test from it.


Step 5

Now the remote agent has been created. This step is going to assign that remote agent to your Access-CT Box. Return to the main menu and choose the Access Series option.


Step 6

Providing you have set your Access Series device up correctly then it will appear in this section, as shown below.

First of all you will need to permit the box to connect to the server, to do this check the box to the far left then click the permit link shown in the image below. This will give you the box show in fig 6b below. Choose the remote agent you just created from the drop down menu and click the permit button. If you have created a specific group then you can move the Access Series into a group using the drop down menu.

The status will then change to Permitted but not connected. When the Access Series box first makes a connection it will show as connected.

If you just want to add a new work order to an already connected Access Series box then just choose the new remote agent from the Select RA drop down menu, shown in fig 6a below. Make sure you have checked the Access Series box before choosing the remote agent.


MyConnection Server

Home
Online Testing Portal
Download
Purchase
Resources
Support

Visualware Products

VisualRoute
eMailTrackerPro
Visual IP Trace


© Visualware Inc. 2014 - All Rights Reserved