Support Overview

Tutorials

Usage Examples

Upgrade Information

FAQ

New Release History

You are here:   Visualware >   MyConnection Server >   Support >   Tutorials >   Create a Remote Agent & add second test to workorder

Create a Remote Agent & add second test to workorder

Step 1

Click the Create RA link in the Remote Agents (RAs) section of the Administration Panel in the MyConnection Server main menu.


Step 2

This is where you decide which test(s) you want the remote agent to run.

This can either be a pre defined test or a custom test (Creating a custom test).

Step 3

The next step is to choose how you want the remote agent to run. The two options are:

Continuously perform connection tests at regular intervals - This will cause the remote agent to run the chosen test(s) at regular intervals (user defined) until it is manually shut down by either the user or the server.

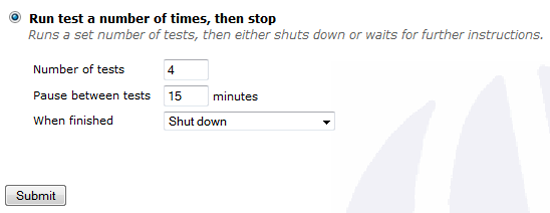
Run test a number of times, then stop - This will cause the remote agent to run a number of tests and then either shuts down or waits for further instructions from the server. The number of tests, interval time and what to do when finished are all user defined.

Step 4

The next step is to publish the remote agent so it can be deployed to the server you want to test to.

Remote agent name - Enter a name to help you identify this remote agent. This name will be used throughout MyConnection Server to refer to this agent.

Download URL - You can either choose to serve a web page for customers to download the agent or if you want to serve the page on a third party web site then you can have MyConnection Server create a zip file with all the files needed to do this.

Results Tag - There are three options for tagging results (to make identifying the results in the database easier). The options are either tag all the results from the remote agent with the clients machine name or prompt the user to enter information to be used for tagging, for example their name, or you can choose your own identifier to tag the results.

Once you are done click the submit button to finish.

You will then get a page with a link to the page you have created or the zip file if you chose to publish on a third party server.


Step 5

The resulting page will differ depending on which download option you chose in step 4 above.

Either way go to the Jump To menu and choose Manage Remote Agents as it's time to add a second test to the work load.


Step 6

From the list of remote agents locate the agent you've just created.

In the list of links just below the title you will find a Change Workload link; click this.


Step 7

You will see the test you chose when setting up the remote agent and just under it a link to add a new task. Click this link.


Step 8

The add a new task page will look similar to the image on the right.

Test to perform

Choose the test you want the new task to perform, this can be any of the predefined tests or a custom test like before.

Test to

If you have more than one MCS server and wish to test to a different server then this can be done here, using the URL and password of the other server.

Send results to

The same applies when sending results, they can also be directed to another server. This can be useful when you have lots of servers and want to keep a central database of results.

Delay for

Simply choose how long to delay before starting the new test

Then perform

Choose the number of tests to perform

Time between tests

Choose how long the remote agent should wait between tests

Click save test to finish.


Step 9

Process complete.

The new test should now be listed in the work load for the remote agent.

The new test will begin testing according to the parameters you chose.


MyConnection Server

Home
Online Testing Portal
Download
Purchase
Resources
Support

Visualware Products

VisualRoute
eMailTrackerPro
Visual IP Trace


© Visualware Inc. 2014 - All Rights Reserved