Support Overview

Tutorials

Usage Examples

Upgrade Information

FAQ

New Release History

You are here:   Visualware >   MyConnection Server >   Support >   Tutorials >   Deliver results to a MySQL database

Deliver results to a MySQL database

Step 1

Click the Configure SQL Export link in the Administration section of the MyConnection Server interface.

Step 2

MyConnection Server needs a MySQL Connector/J driver in order to be able to connect to a MySQL database.

If you do not have this installed then you will see the message shown in red below. This tutorial is for MySQL and not Microsoft SQL server. To enable MySQL support under MyConnection Server, please follow these steps:

1) Download Connector/J from the MySQL website

2) Extract the contents of the archive to the ext directory under MyConnection Server's install directory.

Step 3

Click the Create new SQL profile link.

Step 4

Fill in the details shown in red below based on the MySQL setup you have.

  • Profile name - a user friendly name to help identify the SQL profile you are creating

  • SQL Server - the IP/domain your MySQL server is running on.

  • Port - the port number your MySQL server is running on.

  • Username - the username used to log into your MySQL server

  • Password - the password used to log into your MySQL server

  • Database Name - the name of the MySQL database you want to use to pass the MyConnection Server data to

  • Run this profile automatically on all future tests posted to this database - check this option if you want MyConnection Server to being posting results immediately.
  •  

    Step 5

    Next step is to enter an SQL statement that will post the MyConnection Server results to your MySQL database.

    You will have seen in step 3 there are three examples of SQL statements that perform various tasks.

    You can find these examples in your MyConnection Server SQL Profiles table.


    Step 6

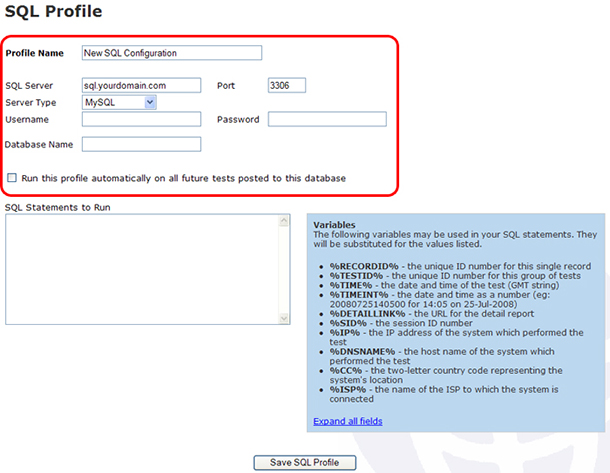
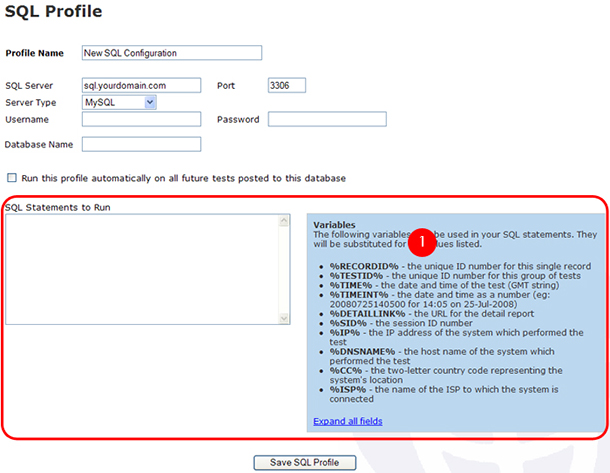
    If you copy and paste the text in the box on the right into the SQL Statements to Run box on your server it will pass all the MySpeed test results into your MySQL server.

    This is explained on the right.

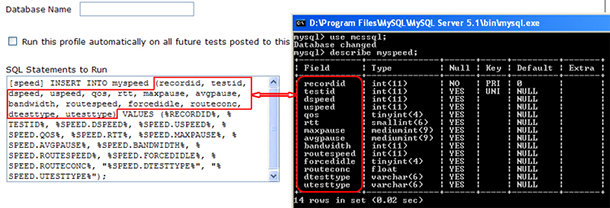
    [speed] INSERT INTO myspeed (recordid, testid, dspeed, uspeed, qos, rtt, maxpause, avgpause, bandwidth, routespeed, forcedidle, routeconc, dtesttype, utesttype) VALUES (%RECORDID%, %TESTID%, %SPEED.DSPEED%, %SPEED.USPEED%, %SPEED.QOS%, %SPEED.RTT%, %SPEED.MAXPAUSE%, %SPEED.AVGPAUSE%, %SPEED.BANDWIDTH%, %SPEED.ROUTESPEED%, %SPEED.FORCEDIDLE%, %SPEED.ROUTECONC%, "%SPEED.DTESTTYPE%", "%SPEED.UTESTTYPE%");

    How does the above statement work?

    • [speed] - the presence of this parameter means the proceeding statement will be processed when ever a MySpeed test is run. The other parameters that can be used are act, voip, capacity, video, route and iptv.

    • INSERT INTO myspeed (recordid, testid, dspeed, uspeed, qos, rtt, maxpause, avgpause, bandwidth, routespeed, forcedidle, routeconc, dtesttype, utesttype) - This part of the statement instructs MyConnection Server to insert the MySpeed results into a table called myspeed and to use the column headings specified between the brackets. Note the column names specified here have to match up with the column names in the myspeed table you have created, as shown in the image below.

    • VALUES (%RECORDID%, %TESTID%, %SPEED.DSPEED%, %SPEED.USPEED%, %SPEED.QOS%, %SPEED.RTT%, %SPEED.MAXPAUSE%, %SPEED.AVGPAUSE%, %SPEED.BANDWIDTH%, %SPEED.ROUTESPEED%, %SPEED.FORCEDIDLE%, %SPEED.ROUTECONC%, "%SPEED.DTESTTYPE%", "%SPEED.UTESTTYPE%"); - This part of the statement specifies the MySpeed results to be passed to the table. A list of parameters for each test can be found in section one shown in the image above.


    MyConnection Server

    Home
    Online Testing Portal
    Download
    Purchase
    Resources
    Support

    Visualware Products

    VisualRoute
    eMailTrackerPro
    Visual IP Trace


    © Visualware Inc. 2014 - All Rights Reserved